Startup Procedure:
When entering the loco, both the driver’s and secondman’s fault lights should be dim, and the battery volts meter should read zero.
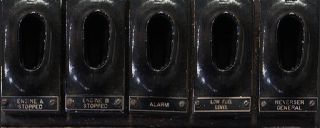
Figure 1a: Driver’s Fault Lights

Figure 1b- Secondman’s Fault Lights
Press the Home key to turn on the battery and fuel pump isolating switches.
The driver’s fault lights should now illuminate, with the Engine A Stopped and Engine B Stopped lights being red, and all others blue,

Figure 2a- Driver’s Fault Lights
The secondman’s fault lights should also illuminate, with the Converter light being red, and all others blue.

Figure 2b- Secondman’s Fault Lights
Verify that the fire alarms function correctly, using the PageUp key.
Press the End key to insert the master key.
Select a direction using the reverser, with either the F or V keys.
The Driver’s Supervision Device (DSD) will activate, with a continuous beeping sound being heard.
Press the Insert key to cancel the DSD.
Return the reverser to neutral, using either the F or V keys.
You will now hear three relay clicks, signifying that the locomotive’s startup self-test sequence has completed, and that you may now proceed to start the engines.
Note: Due to OpenBVE limitations on the number of keyboard keys available to Plugins, I have been forced to implement an engine selector mechanism not found on the real locomotive.
Under normal operating circumstances in a multiple-engined locomotive, you should always start the engine located furthest away from the intended driving cab first. In this case, it is Engine B, and this has been pre-selected.
Press and hold the 3 key until the Engine B Stopped light changes from red to blue, and you hear the engine fire up.
The locomotive is now ready to move using a single engine only. If you require two engines, press the 2 key once to toggle the selected engine to Engine A, and repeat the engine start procedure.
Moving the Locomotive:
Note: The illustrations in this part of the guide assume that you are running using both engines.
Select a forward direction with the reverser, with the F key.
Apply power with the A key.
The torque converter fill cycle now starts- This takes approximately 6 seconds to complete.
The Alarm fault light will now illuminate on the driver’s fault lights.

Figure 3- Driver’s Fault Lights
When the torque converter fill cycle completes, all fault lights should revert to a solid blue.
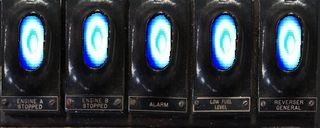
Figure 4a- Driver’s Fault Lights

Figure 4b- Secondman’s Fault Lights
The locomotive will now move off at your selected power notch.
Using AWS:
On this locomotive, AWS is disabled by default. In order to bring the AWS system online, the startup self-test procedure detailed above must be performed. In addition, the locomotive must be stopped, and the reverser placed into neutral.
First, press the PageDown key to toggle the AWS isolation switch- The AWS system self-test procedure will now start.
Press either the F or V keys to select a direction.
Return the reverser to neutral using the F or V key.
The AWS sunflower device will now briefly show a warning indication, and the AWS warning horn will sound continuously.
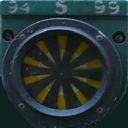
Figure 5- AWS Warning Indication
Press the Insert key to cancel the AWS warning horn.
The locomotive is now ready to move with AWS enabled.
Stopping An Engine:
Stopping an engine may either be performed whilst on the move due to a failure, or whilst stopped at a station.
First, select the engine you wish to stop using the 2 key.
Next, switch to Engine Only mode by pressing the 4 key. This will cut-off traction power.
Return the power controller to neutral using the Z key.
Finally, press the 3 key. This will stop the selected engine, and the appropriate Engine Stopped fault light will change from blue to red.
Additional Features:
It is possible to isolate the fuel pumps, using the 5 key. Both engines will automatically stop, and full service brakes will apply.
In this case, the Engine A Stoppped, Engine B Stopped, and Low Fuel Level lights will be lit red on the driver’s fault lights.
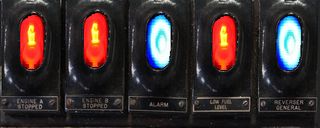
Figure 6- Driver’s fault lights